Concepts
The big concept we used in this project was the Engineering Design Cycle.
The steps are:
The steps are:
- Identify a Need
- Background research/ research the problem
- Develop possible solutions to the problem (brainstorm)
- Select the most promising solution (which one you think will work the best)
- Plan/ Construct a prototype
- Test and evaluate your prototype
- Communicate your design
- Redesign to either make it better or fix any issues you ran into while testing
1. Identify a need
As a class we came up with a list of multiple problems varying from major world crise to more minor issues.Our group was intrigued about researching a solution to help out third world counties.
2. Background Research / Researching the problem
We were unsure of what we wanted to solve in assisting third word countries. We saw that they are struggling in their education, there is famine, and they do not all have clean and accessible access to water.
3. Develop possible solution
We came up with some solutions to each issue. We thought of having a mobile classroom, a classroom that had a water filter attached to it, different farming protocols/ classes, and various water filters.
4. Select your solution
In the end we decided on one of the water filter designs. We thought that would be best since most children can't go to school since they have to get water every day and you need water to grow crops. The only thing was that we had to construct something under $20, because similar devices were already in production.
5. Construct a prototype
During our research we discovered that most of the bacteria is killed with UV radiation. We decided to make it like a backpack because backpacks are more comfortable and easy to wear, unlike carrying buckets, which is what those people are currently doing.
6. Testing our prototype
We were never really able to test our project due to the weather we had during this project. We do know this method works because of other various science research. We did test if our prototype could hold water i.e would it leak water and if it was water tight. We discovered that it was about 87% water tight and it only leaked at the seams a little bit, which was to be expected.
7. Communicating our design
We did this by having a class presentation and by all of our group members websites!
8. / 9. Redesigning/ repeating
We did this constantly through out the project at every step.
How it Works
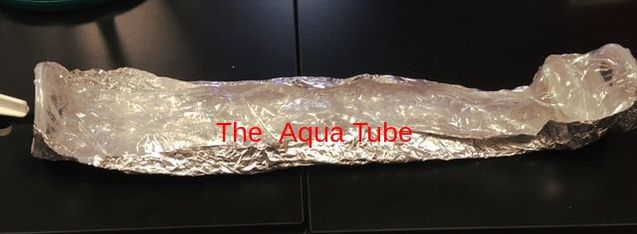
We named our filtration system the Aqua Tube. Our backpack uses UV rays to kill 99.9% of the common bacteria and viruses found in the water and two filters, one at the top and one on the bottom, to remove leaves and some of the dirt.The backpack is made out of clear vinyl with tin foil on the back to get the most exposure to UV rays as possible. The filters are made out of cheese cloth because it can catch what we need it to.
The water would be filtered by the time the people get back from the water source because those people generally have to walk up to three hours to get there and the water takes about three hours to get cleaned. This saves time in the filtration process, so they can drink clean water when they get home.
On each end of the Aqua Tube, there are caps. One cap has a plug in it so you can remove to fill up the container with water. The other cap had a tap on it so you can easily remove the water. Right after the first cap there is a cheesecloth filter to catch the majority of the leaves and debris. Inside the tap there is another cheesecloth filter to remove any of the remaining dirt.
Our Presentation
Reflection
I had positives as well as negatives while working on this project. In this project I felt very comfortable with my teammates and they were a lot of fun to work with. Overall working with people who encourages you, makes me feel more valued, which lead me to contributing more ideas. I was also able to share the leadership roles with my entire group instead of just one or two of us taking control. This benefited my group as well as myself because I did not feel that I was over controlling the project and it was beneficial to our group to listen to everyone's ideas.
Some of my negatives throughout the project was not always dividing up the work evenly. Sometime more work was given to one person and less to another person. That could have made the other member feel less valued. Next time I could make sure that every one has equal work. Also working with my sister provided some challenges. Sometimes I felt like we were leaving our other group members out because we talked about it outside of class. If I work with her again in the future I can try to minimize the amount we talk about the project as to not leave anyone out.
Some of my negatives throughout the project was not always dividing up the work evenly. Sometime more work was given to one person and less to another person. That could have made the other member feel less valued. Next time I could make sure that every one has equal work. Also working with my sister provided some challenges. Sometimes I felt like we were leaving our other group members out because we talked about it outside of class. If I work with her again in the future I can try to minimize the amount we talk about the project as to not leave anyone out.
