What We Did
In this project we learned about reverse engineering, which is where you take an object and take it apart to see how it was made and how it functions. We all started with our own machine and then as a group choose one to learn more about. I started with a mini food processor and as a group we worked on a battery-powered desktop fan.
Mini Food Processor
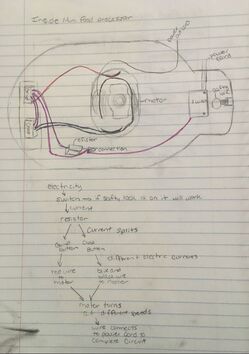
I had a lot of fun taking this object apart because I am an avid baker/ cook, so I use this machine a lot. I was surprised how simple it is. There is a switch, which is turned on by the safety lock. That then completes the circuit. From there the current splits between two buttons, chop and grind, to have the motor run at different speeds to accomplish the different functions.
Battery-Powered Desktop Fan
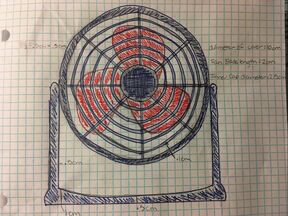
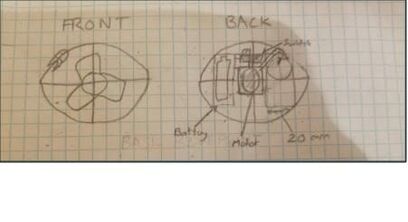
As a group we went into a lot more detail and research with the fan. The fan is comprised of a basket cover, fan blades, and a stand. The plastic basket goes over the fan blades protect people from getting hurt by the rotating blades. The stand holds up the fan and allows people to rotate the direction of the air so they can be more comfortable. Inside the fan there is the motor and batteries. The batteries are the fan’s power source and are located under the fan blades.The batteries are connected to the motor to rotate the blades to move the air. To work the fan there is a switch in the back. That will start to rotate the fan blades.
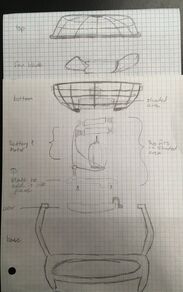
The fan is made up of 13 parts. There are 4 screws .6 cm in length that secure the fan to the base and the cover to the battery. There are 2 AA batteries that power the machine. Two plastic baskets 10 cm in diameter, one half to protect the user from the fan blades and the other one is used to hold the batteries and the motor. There is one motor with a switch on it which will turn it on and off. The motor is 2 cm in width, 3 cm in length, and 1.5 cm in depth. There is one cover that protects the motor and wires (5.5 cm by 2 cm) and the other cover protects the batteries (5.5 cm by 5 cm). The last two pieces are the fan blades that are 2 cm in length and the stand which is 7.5 cm in height and 12.5 cm in length.
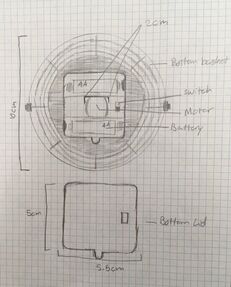
The fan is connected to the stand with screws. There is a pin that connects to the blade of the fan. There are two batteries on the back with a switch that operates the fan. The switch and battery springs connect to a motor which connects to the pin that connects to the blade. The motor is linked to one wire that connects to a conductive metal that transmits the battery energy and another wire that links to the switch and another conductive metal. Basically, when you use force to switch the fan on, the energy from the switch opens the motor to energy, which comes from the battery. If the batteries have energy and the switch is on, the energy goes through the motor and to the end of the pin, which is connected to the fan, causing it to move. Two different types of plastic are used to make the fan. The body of the fan and fan blades are both made out of Polypropylene. I found this by finding the same product online and looking at the material description. Generally there is a code on most plastics that will tell you what type of plastic it is. Polypropylene is resistant to fatigue and can handle hotter temperatures. That makes it great for medical tools, tupperware, plastic bags, and bottle caps. Some characteristics of polypropylene are that it can float, it is cheaper than other synthetic fibers, waterproof, lightweight, and can be made into many different colors. One challenge of working with this plastic is that it has low friction at the molecular level and most glues won’t bond the plastic to other materials. The motor used inside the fan is a 130 Model DC1-6V/3V. It has an RPM of 17000 to 18000.These motors are used most often in toys and small electronics due to the small shaft size of 2 mm. Since the shaft size is so small the torque in turn is also smaller, causing the motor to be fairly weak making it good for toys and small appliances.
Plastic molding is a technique used for shaping the plastics using rigid frames and molds. The molding is commonly used for manufacturing car parts, containers, signs and other high volume items. Plastic molding involves filling liquid polymer in the hollow mold so that it can take its shape. This process involves a high range of pressure and immense heat. There are different techniques used in plastic molding including injection molding, blow molding, rotational molding, and compression molding. The motors includes a motor dc uxcell micro model mini electric speed rc high torque toys toy diy rotary shaft magnetic vibration magnet gear car smart player dvd vdc airplane cylinder hobby helicopter massager pcs cd aircraft terminal part spare cars large stepper wire phase piece rpm output min power terminals appliance kitchen intelligent box varistor cylindrical.
The fan is made up of 13 parts. There are 4 screws .6 cm in length that secure the fan to the base and the cover to the battery. There are 2 AA batteries that power the machine. Two plastic baskets 10 cm in diameter, one half to protect the user from the fan blades and the other one is used to hold the batteries and the motor. There is one motor with a switch on it which will turn it on and off. The motor is 2 cm in width, 3 cm in length, and 1.5 cm in depth. There is one cover that protects the motor and wires (5.5 cm by 2 cm) and the other cover protects the batteries (5.5 cm by 5 cm). The last two pieces are the fan blades that are 2 cm in length and the stand which is 7.5 cm in height and 12.5 cm in length.
The fan is connected to the stand with screws. There is a pin that connects to the blade of the fan. There are two batteries on the back with a switch that operates the fan. The switch and battery springs connect to a motor which connects to the pin that connects to the blade. The motor is linked to one wire that connects to a conductive metal that transmits the battery energy and another wire that links to the switch and another conductive metal. Basically, when you use force to switch the fan on, the energy from the switch opens the motor to energy, which comes from the battery. If the batteries have energy and the switch is on, the energy goes through the motor and to the end of the pin, which is connected to the fan, causing it to move. Two different types of plastic are used to make the fan. The body of the fan and fan blades are both made out of Polypropylene. I found this by finding the same product online and looking at the material description. Generally there is a code on most plastics that will tell you what type of plastic it is. Polypropylene is resistant to fatigue and can handle hotter temperatures. That makes it great for medical tools, tupperware, plastic bags, and bottle caps. Some characteristics of polypropylene are that it can float, it is cheaper than other synthetic fibers, waterproof, lightweight, and can be made into many different colors. One challenge of working with this plastic is that it has low friction at the molecular level and most glues won’t bond the plastic to other materials. The motor used inside the fan is a 130 Model DC1-6V/3V. It has an RPM of 17000 to 18000.These motors are used most often in toys and small electronics due to the small shaft size of 2 mm. Since the shaft size is so small the torque in turn is also smaller, causing the motor to be fairly weak making it good for toys and small appliances.
Plastic molding is a technique used for shaping the plastics using rigid frames and molds. The molding is commonly used for manufacturing car parts, containers, signs and other high volume items. Plastic molding involves filling liquid polymer in the hollow mold so that it can take its shape. This process involves a high range of pressure and immense heat. There are different techniques used in plastic molding including injection molding, blow molding, rotational molding, and compression molding. The motors includes a motor dc uxcell micro model mini electric speed rc high torque toys toy diy rotary shaft magnetic vibration magnet gear car smart player dvd vdc airplane cylinder hobby helicopter massager pcs cd aircraft terminal part spare cars large stepper wire phase piece rpm output min power terminals appliance kitchen intelligent box varistor cylindrical.
Drawing of front
|
Exploded View
|
Drawing of back/ inside
|
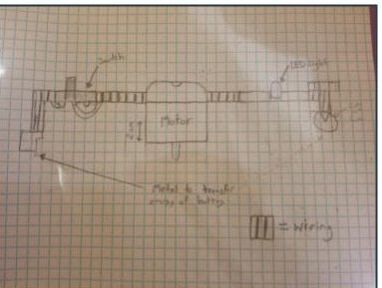
Our next step for this project was to add on to or change the current machine. We thought that adding a light to the fan could be cool because often there are lamps/ lights on a desk, so we combined them. However we were not able to execute this, but we were able to figure out how it would be done theoretically.
Basically, we added an LED light in between the blue wire and replaced the AA battery on that side with a coin cell battery. We did this because an LED light requires around 1.8 to 3.3 Volts to light up and a AA battery provides 1.5 Volts. Because of this, we can’t even reach the minimum of lighting the LED, let alone charging the fan. A coin cell battery, however, provides around 3 Volts of energy, which is enough to charge the LED moderately and charge the fan. In order to make this motor design fit with the desktop fan, we would drill the left side of the battery so it can fit the coin cell battery. Additionally, we would attach the LED to the outside of the fan so it’s on display while the fan is running.
Basically, we added an LED light in between the blue wire and replaced the AA battery on that side with a coin cell battery. We did this because an LED light requires around 1.8 to 3.3 Volts to light up and a AA battery provides 1.5 Volts. Because of this, we can’t even reach the minimum of lighting the LED, let alone charging the fan. A coin cell battery, however, provides around 3 Volts of energy, which is enough to charge the LED moderately and charge the fan. In order to make this motor design fit with the desktop fan, we would drill the left side of the battery so it can fit the coin cell battery. Additionally, we would attach the LED to the outside of the fan so it’s on display while the fan is running.
|
|
Diagrams of Redesigned Fan
Reverse Engineering
- Identify Purpose - what is the purpose of the machine
- Develop Hypothesis - how do you think the object works
- Disassemble - take apart the machine and document all parts
- Analyze the Elements - structural, functional, materials, and manufacturing
- Prepare the Report - write a report based on your findings
- Redesign - make you machine do something different, or add on to pre-existing machine
You can do these steps in any order similar to the design cycle, where you can go back and rethink what you already did.
5 Cornerstones of Ethical Behavior
1. Do what you say you will do
2. Never divulge information given to you in confidence
3. Accept responsibility for your mistakes
4. Never be involved in a lie
5. Never accept gifts that compromise ability to preform in best interests of organization
2. Never divulge information given to you in confidence
3. Accept responsibility for your mistakes
4. Never be involved in a lie
5. Never accept gifts that compromise ability to preform in best interests of organization
Fundamental Canons for Engineers
1. Hold paramount the safety, health, and welfare of public
2. Preform services only in area of competence
3. Issue public statements only in objective and truthful manner
4. Act for each employer or client as faithful agents or trustees
5. Avoid deceptive acts
6. Conduct themselves honorably, responsibly, ethically, and lawfully as to enhance honor, reputation and usefulness of profession
Reflection
This project was fun in many ways. As a kid I always loved taking apart things to look at the inside, so I really enjoyed this project. I learned about the purpose for reverse engineering and what it is like to be an engineer in the real world. Before this project I never heard about the fundamental canons for engineers, but upon learning them, I realized why they are so important. They are important because it holds you up to a standard of ethical behavior and responsibility, which is something you don't immediately think of when thinking about engineering, but is extremely vital to the profession.
This project was also difficult in many ways. Most of my group members had to be prodded to do things, making working with them to be frustrating. They also didn't always get the work done when we said we were on our gantt chart, meaning I would have to sometimes pick up their slack. However I can learn from this and not be so controlling over group projects.
This project was also difficult in many ways. Most of my group members had to be prodded to do things, making working with them to be frustrating. They also didn't always get the work done when we said we were on our gantt chart, meaning I would have to sometimes pick up their slack. However I can learn from this and not be so controlling over group projects.
