What We Did
We started out following a program to make a Formula 1 helmet, where we learned the basics of all the different functions of Autodesk Fusion 360. After we completed the tutorial, we took what we knew and created our own helmet. For our redesign of a helmet, we followed along the same model as the one we were using to learn the program. We designed this helmet to be good for skateboarding as it requires more protection than biking, and not nearly as much as a racing helmet. We did this because we did not have much time to start from scratch, and the helmet we wanted to design was similar to what we were already working on. For our helmet we added extra features such as sunglasses, a chin strap, and ventilation holes.
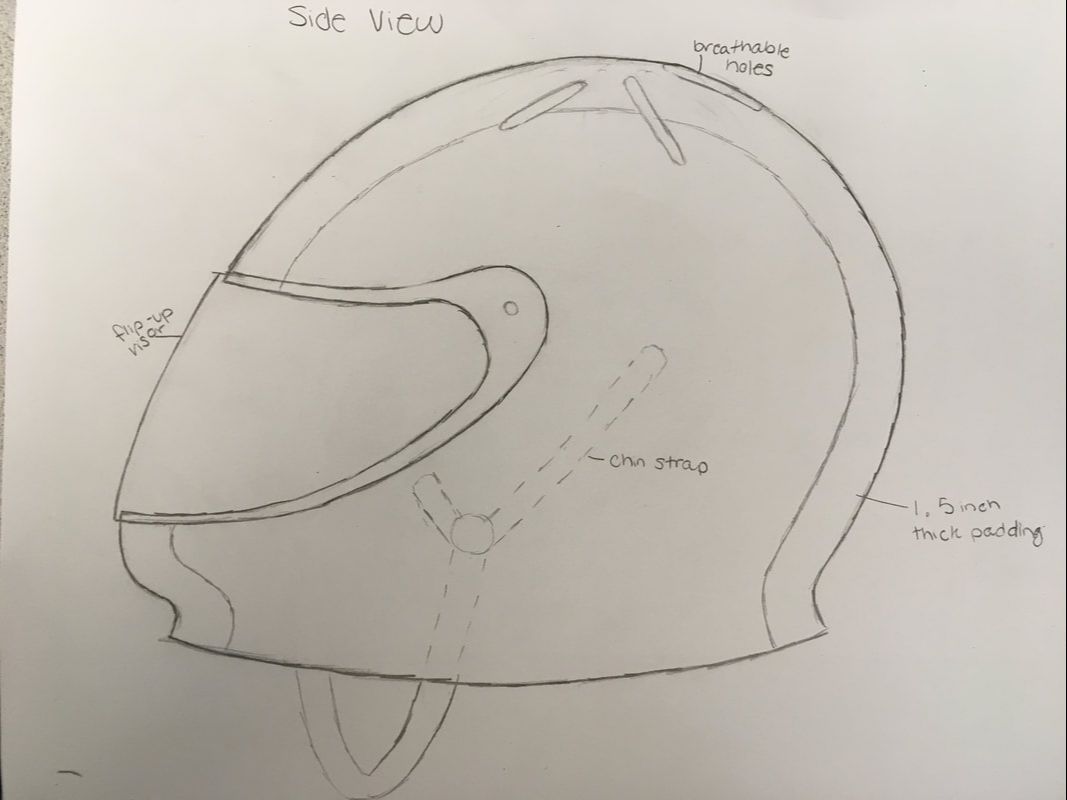
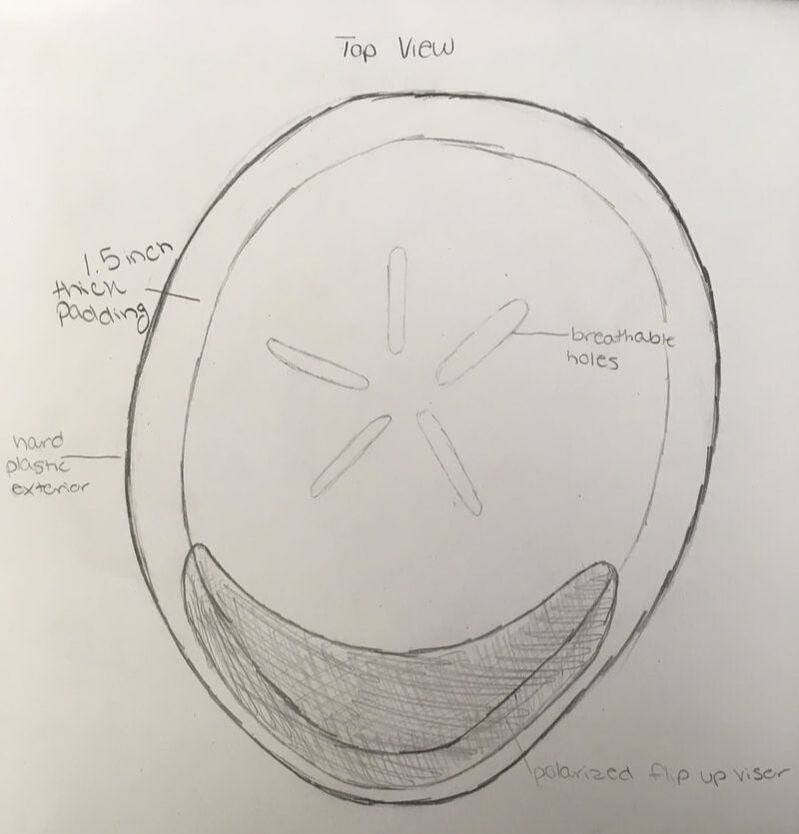
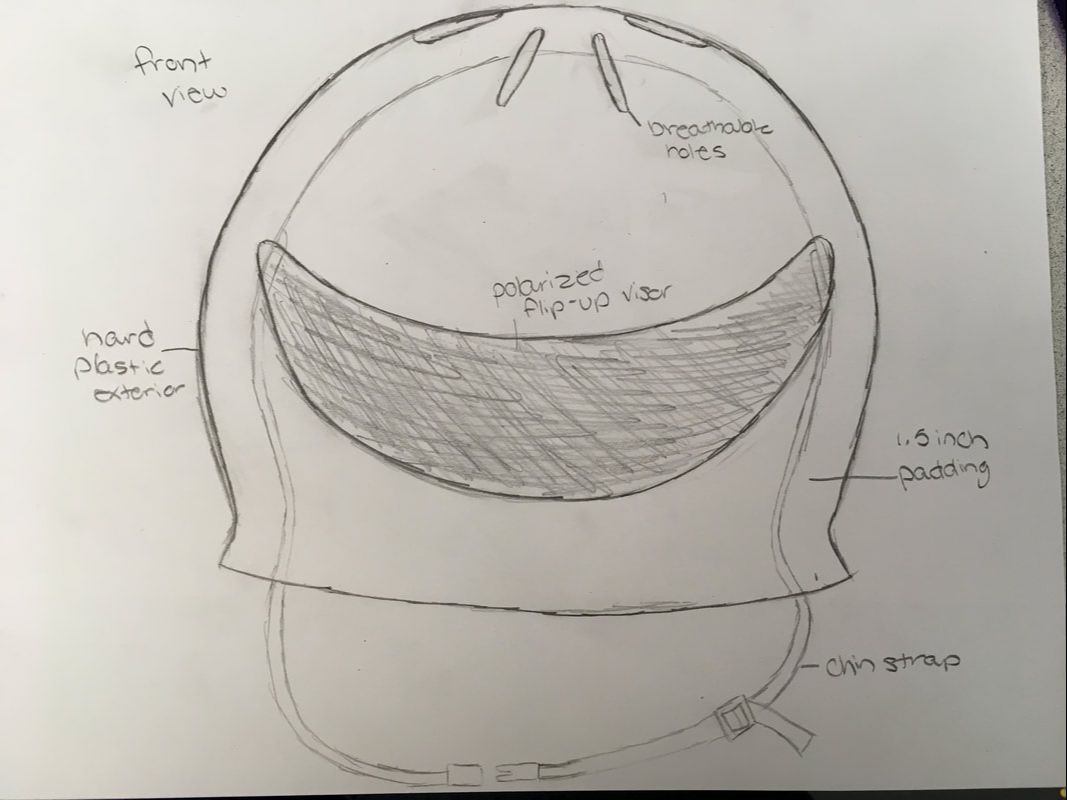
Helmet Sketches
|
|
Pattern on Helmet

Link to 3D Helmet
https://a360.co/3bzeVuY
Features of Our Helmet
Our helmet meets the safety features of a skating helmet. Our padded lining is over an inch thick, and regulation states that it has to be at least one inch thick. The outer shell is a hard plastic which increases the helmet’s safety. We chose the hard plastic as opposed to other materials as plastic is both cheaper and lighter than other materials.The inside of the helmet is lined with a soft cotton fabric and expanded polystyrene to be both comfortable and breathable. The flip up visor is a polarized lens, as to protect the wearer from glare from the sun, making it safer to ride when it is sunny. When it is cloudy or dark, the visor flips up as to not make everything look too dark for the wearer. On the top of the helmet there are small little slits as to also make the helmet more breathable and less stuffy. There is a chin strap that is fitted inside of the helmet, as to make sure the helmet does not come off, and to meet safety regulations. The chin strap is made out of a synthetic band, the type found on most bike helmets. While designing this helmet we considered the acceleration of objects coming into impact on the helmet. From past classes we know that acceleration is change in speed over time and the speed is dependent on the acceleration. The coefficient of friction is the measurement of the friction in the helmet. We noticed that the expanded polystyrene and our heads will create a static and absorb most of the energy of a collision. We took in consideration of the kinetic friction and how the helmet would hold up if it got in contact with the ground. This helmet is mainly used for bikers and skateboarders because their g force is relatively similar.
On average a skateboarder can travel around 9 mph, and the average weight of an adult male being around 150 lbs. We estimated that impact time would be 1 second. Using the impact equation, we found that the rider would feel about 274 N, or 62 lbs of force of force from the impact. This is not that much force considering that football players get hit with at most 1600 lbs of force. However if the impact time is shorter, the force will be greater. The plastic we chose for the exterior of the helmet can withstand up to 150 lbs of force before it starts to crack, and up to 450 before the helmet is completely destroyed and offers no more protection.
On average a skateboarder can travel around 9 mph, and the average weight of an adult male being around 150 lbs. We estimated that impact time would be 1 second. Using the impact equation, we found that the rider would feel about 274 N, or 62 lbs of force of force from the impact. This is not that much force considering that football players get hit with at most 1600 lbs of force. However if the impact time is shorter, the force will be greater. The plastic we chose for the exterior of the helmet can withstand up to 150 lbs of force before it starts to crack, and up to 450 before the helmet is completely destroyed and offers no more protection.
Key Concepts
- Acceleration - this is the change of speed over a change in time. This is important when designing a helmet because you want to make sure the helmet can withstand a crash as you are accelerating.
- Coefficient of Friction - the coefficient of friction tells you how much friction a certain material has. To find this coefficient you divide force that resists motion by the normal force.
- Crumple Zone - These are areas on an object meant to crumple upon impact as to absorb some of the shock and force. This can be seen on many cars where the hood will crumple in a collision as to protect the driver and any passengers.
- Drag - Drag refers to the resistance of air. This is very important in designing helmets especially ones for sports where speed is important because you want to design the most aerodynamic helmet as to not create drag for the user.
- Inertia - This is part of Newton's Laws of motion. It states that an object in motion stay in motion unless acted upon by an outside force. Again this is key to a helmets design because when the user gets in an accident, they will want to keep going forward and the helmet helps to prevent any injuries caused by that.
- G Force - this is the force that acts upon your body as a result of acceleration. 1 g is equal to one acceleration due to gravity, which is 9.8m^2/s.
- Friction - this is the force that resists motion between two objects.
- Force - this is how much effort it takes to move some object. It also causes masses to accelerate.
- Kinetic Friction - this occurs when two objects are moving relative to each other.
Reflection
I had fun learning how to use the 3D modeling program, as I thought it was cool to see an object come together from creating several faces and bodies. I will definitely use this program again, as I will need to use it in college, and probably after college too. I liked how I was able to get creative in designing the helmet because we had to create something not only functional, but something a person would buy that is different than anything else on the market.
This project also can with many challenges. The biggest one was time. Although we were given several weeks to work on it, we could only use the school desktops. The desktops were sometimes very slow, and on multiple occasions had to restart, which took the entire class period. Another issue I encountered was that the instructional videos use an outdated software, which made it very confusing at times, because our screens did not line up with the instructor's screen.
This project also can with many challenges. The biggest one was time. Although we were given several weeks to work on it, we could only use the school desktops. The desktops were sometimes very slow, and on multiple occasions had to restart, which took the entire class period. Another issue I encountered was that the instructional videos use an outdated software, which made it very confusing at times, because our screens did not line up with the instructor's screen.
