What We Did
In this project we did some smaller labs and experiments on top of designing a solar tiny house. Our first lab was a solar water heater. Our second project was to make a model house with multiple day lighting techniques. Our third project was finding the heat constants of different building materials to find what are the most advantageous in our house designs. The forth part was making a wind turbine to learn about the generation of electricity. The final part of this project was designing a tiny house using the results of our previous experiments.
Water Heater
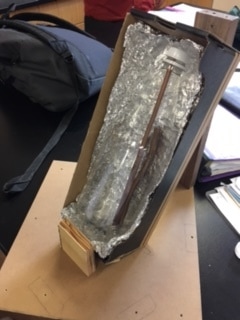
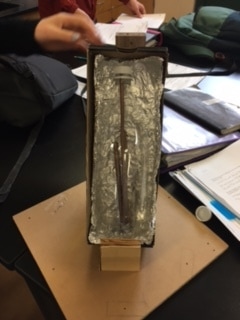
In this project we had to design a structure that would heat water to the highest temperature. We used our knowledge of insulation and conductors to create something that would heat up water. Our design was a clear plastic water bottle inside of an open shoe box. The box was lined with tin foil and insulating fabric so the heat would be reflected back to the bottle. Inside the bottle there were multiple copper tubes to also keep the water warm since copper is a great conductor.
|
|
Day lighting techniques
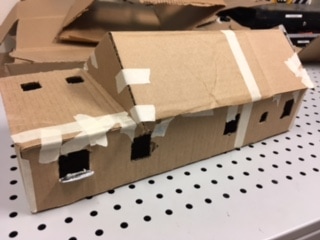
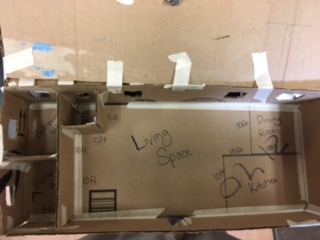
In this project we had to design a 1,000 sq ft house. We did not include any windows as to just figure out the electrical consumption of our house, which was 11.52 kWh for 30 60-watt bulbs. We then used our knowledge of day lighting techniques to design and model a house that would use little to no electrical. Our second house only used 1.428 kWh. We discovered that windows on the south wall were mandatory to get both summer and winter light, while our solar tubes and light shelves were not as effective. That was slightly from how we manufactured them and because they did not get the summer and/ or winter light based on their angles in relation to the sun.
|
|
|
Heat Constant Lab
In this project we tested multiple materials under a heat lamp to see how they absorb and retain heat and to find the objects specific heat capacity. The heat lamp was hung 1ft. above the material we were testing. We placed the material on a piece of cardboard so the material would not lose heat to the counter. Every 2 minutes we took the temperature of the material in about the same location each time. We took the temperature of the materials for 10 minutes with the lamp on and 10 minutes with the lamp off.
Wind Turbine Lab
We had to design a wind turbine that would spin the fastest which would then generate the most electricity. Our blade shape was leaf shaped and smaller than the biggest fan. Our design was then able to generate 0.69 watts. We discovered that the horizontal wind turbines worked the best in letting the fan spin the fastest.

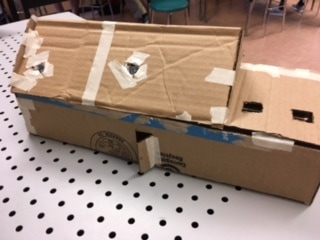
Tiny House
This part of the project was the biggest. We had to use all that we had learned to make a tiny passive solar house to fit the functions that we saw fit. We had to blueprint the interior and exterior walls and come up with a budget for all the materials we needed to build our house. We decided to make our house a trailer so the owners can go almost anywhere with it. We did not model our house for extreme weather, but it can withstand slight snow, rain and heat. In total our house cost $19,916.48, But with human we can round it up to $20,000, but it can be more or less depending on the design choices of the house.
Interior Blueprints

SOUTH WALL
We decided to have three windows on this wall because of our discoveries from the day lighting lab. The table we made in the picture is a folding table which means that you can pull it away from the wall to make it more square. 
WEST WALL
We had one window on this side so you can get the morning light. In the loft there is a light and it is in a cage so it makes the bulb harder to break. 
AERIAL VIEW
This is the aerial view of both stories of the house. It shows the placement of the pot light which we chose to make the house feel less cramped. You can also see the tankless hot water heater we chose to save space. The loft is made out of the slope in the roof, which only makes it suitable for sleeping. The loft itself can fit a queen sized bed. The entire interior of the house is painted in canyon echo because a lighter color reflects light back to the house, while darker colors such as black absorb light and heat make the house feel darker and hotter, while white can make the house feel brighter and cooler. |

NORTH WALL
We decided to put the majority of the furnishings on this wall because we did not have any windows on this side due to the sun's angles. The kitchen has a gas range with oven and a refrigerator, making it suitable to live in year round. The sink also has a removable cover over it giving you more work space. The stairs has drawers in each step and rods and shelves underneath them to provide maximum storage for a tiny space. 
EAST WALL
We added a small window on this side so you can get the evening sun. 
BATHROOM
This is the lay out for each wall for the bathroom. You can see that the entire bathroom is used by the shower. We can up with this idea to save space. We also had tiling all over the walls until the slope because tile can withstand water, while other materials can not. We also tried to place bathroom items that you would not want to get wet (towels, toilet paper) away from the shower head so they can try to stay dry. |
Budget List (includes building materials and furnishings)
Concepts
We learned various things throughout each part of this project.
- WATER HEATER
- Conduction- transfer of heat through a material (solid)
- Convection- transfer of heat through a fluid (liquid/ gas)
- Radiation- transfer of heat through waves or rays (no medium required; space)
- Conductors- Good conductors will feel either hotter or colder to the touch because they have a higher thermal conductivity. Generally theses are materials that are metal and/ or dark in color. An example of this in our project was the copper pipe and tin foil.
- Insulation- These are materials that are bad at conducting heat because they absorb the heat. These materials have a lot of air pockets because air can contain heat. An example of that is insulating fabric and shredded newspapers.
- DAY LIGHTING TECHNIQUES
- Solar tubes- This is a tube that is placed on the south side of the roof. The sunlight then enters through the domed top and bounces around inside of the reflective tube. When it exists the tube on the ceiling, it scatters the light all around the area.
- Clerestory Windows- These are windows on the south side of the house near the roof. They are able to let more light in.
- Light Shelves- These can be on different sides of the house depending on the type you are using. Generally they are the south side of the house under the windows. They are able to reflect the light deep in to the house so more natural light is able to get into the house.
- Skylight- They are windows on the roof that can provide direct sunlight to a part of the house that normally would not get any.


|


|
- Sun Angles- We learned that the angles which we perceive the sun's rays change throughout the year based on where we are in our orbit. The Earth's tilt is always 23.5*, which creates the seasons as the direct rays from the sun alternate between the northern and southern hemispheres. In Novato the sun is never higher than 75* above the horizon and is never lower than 27* in the horizon.
- Equator Facing Windows- In the northern hemisphere theses are south facing windows. Windows facing this way provide a light in because the sun's most direct rays are generally to the equator, which means that windows facing that way will also get a great deal of light.

- HEAT CONSTANT LAB
- Specific Heat Capacity- This is a measure of how much heat an object can hold. The equation you would use to find this is 1cal/g*c (one calorie over gram degrees Celsius). The higher the heat constant means that it cools more slowly and the lower the heat constant means that it heats and cools quickly.
- Heat- This is the energy due to the kinetic vibrations of molecules. The equation to find heat is mc∆T (mass x specific heat capacity x change in temperature).
- TINY HOUSE
- How to build a floor- (from the inside out) 1. Flooring Material (tile/ hardwood) 2. Subfloor (plywood) 3. Framing with insulation in between (2"x 8" pieces of wood)(wire mesh under insulation) 4. Foundation (concrete/ trailer)
- How to build a wall- (outside in) 1. exterior paint 2. Siding (shingles) 3. Water Resistant Layer (tyvek) 4. Plywood 5. Lumber Framing (studs; 2" x4") 6. Drywall 7. Texture/ Interior Paint
- How to build a roof- (exterior in) 1. Shingles 2. Tar Paper 3. Plywood 4. Lumber Framing with Insulation 5. Drywall 6. Texture/ Paint
Reflection
In this project our time management was good. We were more aware of what days we had to work on certain parts of the project, so by the end we were not scrambling to finish. This was beneficial because we were able to look over our work and not feel rushed. I was also able to keep some of my group members focused on different parts of the project because after a while we all got tired of the project. It was important to keep us all on task because if we were all off task we would have not been able to accomplish what we did.
One of my downfalls in this project was taking to much control. My group wanted me to do a lot and I feel that I did not share the work with them. When doing that I feel that I also took to much control over the design choices and key features. Next time I can try to ask everyone's opinions in the task that I am taking leadership of instead of doing just what I want.
One of my downfalls in this project was taking to much control. My group wanted me to do a lot and I feel that I did not share the work with them. When doing that I feel that I also took to much control over the design choices and key features. Next time I can try to ask everyone's opinions in the task that I am taking leadership of instead of doing just what I want.
