The goal of the project was to move the car a distance of five meters and be able to move 100 pennies or something of equal weight. We could not make a chemically powered car or battery opertated car. We also could not push the car ourselfs and whatever moved the car had to move with it.
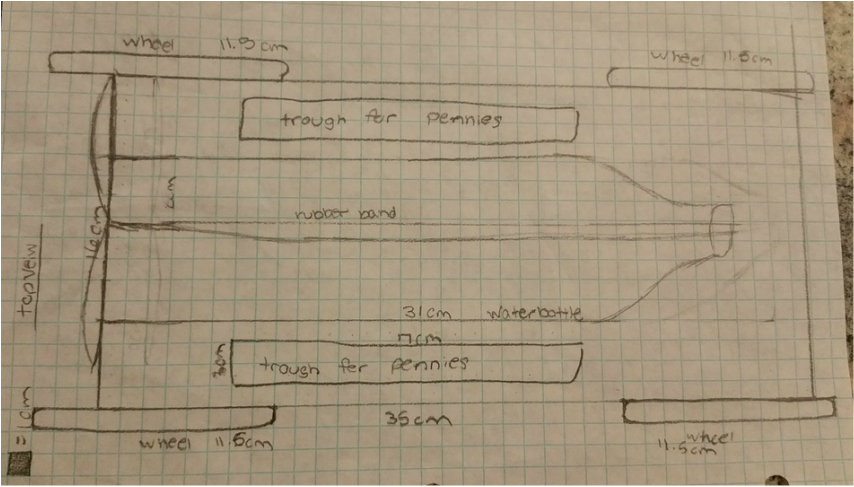
Our original idea was to have a propeller car, but the car only moved about two inches without weight. We were trying to do that by twisting a fan blade by way of a rubber band. That is when our group realized that we could move the car by wrapping a rubber band around the axle which we used in our final product.
Our original idea was to have a propeller car, but the car only moved about two inches without weight. We were trying to do that by twisting a fan blade by way of a rubber band. That is when our group realized that we could move the car by wrapping a rubber band around the axle which we used in our final product.
Our Original Blueprint
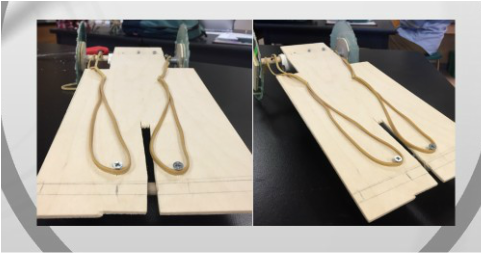
Final Car
For the body of the car we used thin wood that would hold the weight and still be light enough to go the distance similar to our original design. Our back wheels were made out of CDs with hot glue on the outside to add traction. The front wheels were from a toy car that we removed from. These wheels just slide across the ground which created a lot of friction which effected the overall distance that our car traveled. We decided to place the weights in the back of the car to help it travel the total distance.
Final Product
Graphs of Energy
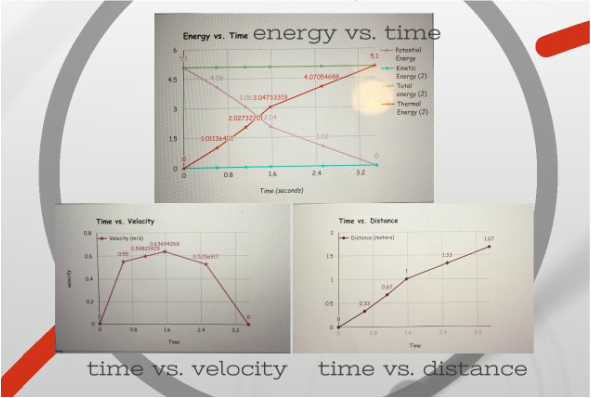
You can see in our energy vs. time graph, that the kinetic energy was not a lot. That was because of all the friction the front wheels had. The thermal energy shows how much of our potential energy (5.1 J) was loss due to friction and was not turned into kinetic energy. Our velocity peaked shortly after it started because of all the friction that was occuring.
The Science We Used
- Spring Constant- That is the measure of how hard it is to expand a spring. The spring we used in our project were the rubber bands. The equation you would use is F=kd, where "k" is the spring constant and "d" is the distance that the rubber band/ spring stretch.
- Potential Spring Energy- This shows you how much potential energy a spring has when it is stretched to the distance you want. The equation is different than that of potential energy. The equation is PEspring=1/2(k)x^2, where "x" is the distance of how far you stretched it. (on our graph it is just labeled as "potential energy")
- Kinetic Energy- Kinetic energy should theoretically be equivalent to potential energy because the potential energy converts to kinetic as the object is released. That, however, is not always the case because most energy is lost due to friction. The equation is KE= 1/2mv^2.
- Velocity- This is the rate of distance an object covers in a given amount of time. The equation for velocity is v=d/t
- Thermal Energy- This is energy that is in the form of heat. To find this you subtrac the kinetic energy from the potential energy.
Reflection
One of my strengths throughout this project was that I communicated with my group better. We were able to come up with solutions in a much faster and effective way. This was key to completing our project since we went through many designs and had to agree on what to include on each new model. We also planned on what the design was well because we were able to make a list of what we needed. That was helpful because we had all the materials we needed when it came time to build.
One of my weaknesses in this project was trying to get our group focused on the task. Multiple times my group members were talking with their friends or goofing off including myself. It was hard to do the project because we were generally missing one of our group members, making it harder to accomplish anything. Next time I can try not to be distracted by other groups or by my friends. Another challenge was not doing the calculations because I did not originally know how we came up with some of our answers. Next time I can ask for my group members to show me what they did so I understand our calculations.
